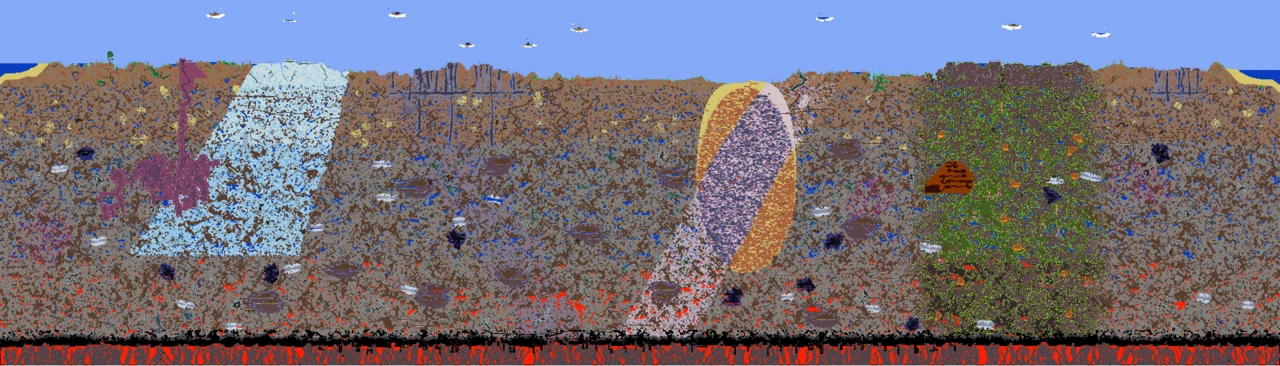
Initial Hardmode map of a small PC-version world. Notice the "V" made of the new outburst of Corruption (dark purple) and Hallow (pale pink) biomes, which each replace existing world blocks upon defeat of the Wall of Flesh.
"The ancient spirits of light and dark have been released."
Hardmode is a harder version of the initial world. A world permanently converts to Hardmode after the player defeats the Wall of Flesh in that world.
Hardmode contains new Biomes called the Underground Corruption/Underground Crimson and The Hallow (along with the Underground Hallow). Corruption/Crimson and Hallow both spread continuously in Hardmode, and can eventually overtake an entire Map.
Demon Altars/Crimson Altars become breakable with the Pwnhammer (which drops from the Wall of Flesh), and upon doing so, new Ores become available.
Along with all regular enemies, Hardmode contains new enemies that are more difficult, some of which are "upgraded" versions of pre-Hardmode enemies. In addition, coin drops and item prices both rise.
Hardmode also makes new Armors, Weapons, Accessories, and other items available that will help, and are sometimes essential, in dealing with new Hardmode challenges. Some of these become available for purchase from NPCs, as drops from enemies, or are craftable using new Hardmode materials and crafting stations.
Hardmode also gives some NPCs better methods of self-defense. For example, Pre-Hardmode Arms Dealer defends himself with a Flintlock Pistol, but when Hardmode begins, Arms Dealer will start defending himself with the Minishark.
Biomes

The Hallow's surface during the Day, showing a Unicorn and four Pixies.
Defeating the Wall of Flesh triggers the announcement, "The ancient spirits of light and dark have been released." Immediately, two diagonal stripes of the new biomes generate, replacing large sections of the World in a "V" pattern that extends from the center of The Underworld all the way to the surface.
- The Hallow/Underground Hallow generate in all worlds.
- The Underground Corruption generates as the second new biome in worlds that contain Corruption biomes.
- The Underground Crimson generates as the second new biome in worlds that contain Crimson biomes.
Underground Corruption and Crimson primarily replace stone, sand, ice and snow. Underground Jungle biomes do not generally contain these in significant amounts, and so are not replaced (though the Underground Jungle does have its own new Hardmode entities). The mud in an Underground Jungle will slowly be converted upon contact with the Underground Corruption or Crimson.
The Underground Corruption/Crimson looks similar to the surface Corruption/Crimson, though containing several new Corruption/Crimson-themed enemies.
The Hallow represents a brand-new theme, distinguished by its pastel-colored fairytale imagery. Rainbows make up the surface's background image, its trees are puffy and multicolored, and enemies look similarly whimsical, such as the Unicorn and Pixie. Do not be fooled, though: Hallow enemies are quick, resilient, and deadly, and their spawn rates are high.
Spread
Corruption, Crimson and Hallow spread actively in Hardmode:
- Corruption, Crimson and Hallow will spread to stone, sand, ice, and grass that are up to three tiles away.
- Almost all other blocks are immune to Corruption/Crimson and Hallow.
- Mud will slow the spread of Corruption and Crimson, but not stop it, since Corruption and Crimson can convert mud blocks into dirt over time. Mud blocks containing mushroom grass are not affected. Hallow cannot convert mud at all.
- Hallow and Corruption/Crimson cannot convert each other.
- Template:Mobile icon If you put a sunflower next to the Corruption/Hallow it will not spread.
These new properties mean that Hallow and Corruption/Crimson will now continuously spread, and can reach your home base, given enough time. It is advisable to take steps to protect any areas you want to invest time in keeping around, which can be done by mining away a four tile wide frame surrounding the area, then sealing it in with Wood or Clay. A Sky City is another option.
Ores
The Wall of Flesh always drops the Pwnhammer upon its defeat, which can be used to destroy Demon/Crimson Altars (note that bringing the Pwnhammer to a pre-hardmode world will not allow you to destroy Demon Altars there). The first three Demon Altars destroyed will trigger the creation of three new Ores, in the following order:
- The first destroyed Demon Altar or Crimson Altar will trigger the creation of Cobalt Ore or Palladium Ore.
- The second destroyed Demon Altar or Crimson Altar will trigger the creation of Mythril Ore or Orichalcum Ore.
- The third destroyed Demon Altar or Crimson Altar will trigger the creation of Adamantite Ore or Titanium Ore.
For every Demon Altar you break, 1-3 Wraiths will spawn immediately. The new ores are created by replacing existing World blocks.
Subsequent Demon Altars destroyed will begin the cycle again, though the fourth to sixth altars will drop half as much ore as the first ones, the seventh to ninth will drop only one third of the ore of the first ones, and so forth. This "multiplier" can be calculated with the formula 1/(ceiling(n/3) + 1 - sgn(n)) where n is the number of altars destroyed. So, destroying the 19th altar would yield one-seventh of Cobalt Ore or Palladium Ore compared to the first altar.
Each time a Demon Altar is destroyed, there is also a chance that a single random tile of rock in the world will be converted into ebonstone/crimstone or pearlstone, which will likely grow to become a new underground Hallow or Corruption/Crimson given enough time.
No matter how many Altars are destroyed, Ore rarity remains set with Cobalt/Palladium being the most common, followed by Mythril/Orichalcum, then Adamantite/Titanium as the most rare.
Mining and crafting
- Mining Cobalt Ore or Palladium Ore requires at least the Molten Pickaxe or the Reaver Shark.
- Mining Mythril Ore or Orichalcum Ore requires at least the Cobalt Drill, Cobalt Pickaxe, Palladium Drill, or the Palladium Pickaxe. Crafting many higher-tier Hardmode items will require a Mythril Anvil or Orichalcum Anvil, which is crafted from 10 Mythril or 12 Orichalcum Bars.
- Mining Adamantite Ore or Titanium Ore requires at least the Mythril Drill, Mythril Pickaxe, Orichalcum Drill, or Orichalcum Pickaxe, however on the Console version you may use Palladium Drill or Palladium Pickaxe. Cobalt Drill and Cobalt Pickaxe however, will not mine Adamantite or Titanium. Crafting Adamantite Bars or Titanium Bars will require an Adamantite Forge or a Titanium Forge, which is crafted from a Hellforge and 30 Adamantite/Titanium Ore.
Bosses
The three Mechanical Bosses are more difficult "upgraded" versions of the regular-mode bosses, and are summoned via new craftable items:
- The Destroyer is the Hardmode version of Eater of Worlds, and is summoned by the Mechanical Worm. Even though the Eater of Worlds can only be summoned in a world with a Corruption, the Destroyer can be summoned in a world with a Corruption or Crimson.
- The Twins are the Hardmode version of the Eye of Cthulhu, and are summoned by the Mechanical Eye.
- Skeletron Prime is the Hardmode version of Skeletron, and is summoned by the Mechanical Skull.
- Template:Console icon Template:Mobile icon Ocram is summoned using a Suspicious Looking Skull at night. This was the hardest boss in the console edition before the 1.2 update.
- Template:Mobile icon When Wall of Flesh is defeated, a pop-up box will appear briefly describing Hardmode.
After all three mechanical bosses are defeated (only one on Template:Console icon console and Template:Mobile icon mobile versions), Plantera becomes available for summoning:
- Plantera is a giant plant-like monster summoned by destroying Plantera's Bulb in the Underground Jungle after all three preceding bosses have been defeated (one on console edition or mobile edition)
After Plantera is defeated and a Temple Key is collected from it, the Golem becomes available:
- Golem is found in the Jungle Temple, which is opened by the Temple Key that Plantera drops.
- Template:Pc icon Duke Fishron is a horrid pig-fish-dragon hybrid found in the Ocean. He is summoned by using Truffle Worms as bait in an ocean biome which only spawn in the mushroom biome during Hardmode.
- Template:Pc icon The Lunatic Cultist becomes available as four cultists appear in the entrance of the Dungeon after defeating Golem. The Lunatic Cultist spawns after these cultists are defeated. Defeating him subsequently triggers the Lunar Events.
- Template:Pc icon The Moon Lord becomes available after beating the Lunar Events. When the Lunar Events are completed, the Moon Lord will spawn automatically after a short delay; or it can be summoned without fighting the Lunatic Cultist or Lunar Events by using a Celestial Sigil.
All pre-Hardmode bosses can still be summoned in Hardmode.
Post-Plantera
Once Plantera is defeated, the world undergoes a second minor transformation:
- New enemy types begin spawning in the Dungeon, which are even harder than ordinary Hardmode enemies. See Dungeon for the list of post-Plantera enemies.
- The spread of the Hallow, Corruption, and Crimson is slowed.
- The Cyborg NPC becomes available.
- The Truffle NPC begins selling the Autohammer, which crafts Shroomite Bars.
As secondary effects, a post-Plantera world offers access to the following:
- The Jungle Temple and its Golem boss, using the Temple Key that Plantera drops.
- The Pumpkin Moon and Frost Moon events, via the Pumpkin Moon Medallion and Naughty Present, respectively. Crafting these requires the Ectoplasm that new Dungeon Spirits drop.
- Biome Chests, via Biome Keys. Template:Console iconTemplate:Mobile iconThese require Temple Keys that Plantera drops, in addition to Biome Key Molds or as of the 1.3, just the Biome Key as Biome Key Molds were removed.
== Enemies ==klhjsw'thklerererererererererererererererererererererererererernu
![]() Angler Fish •
Angler Fish • ![]() Armored Skeleton •
Armored Skeleton • ![]() Black Recluse •
Black Recluse • ![]() Blood Feeder
Blood Feeder ![]() Chaos Elemental •
Chaos Elemental • ![]() Clinger •
Clinger • ![]() Clown •
Clown • ![]() Corruptor •
Corruptor • ![]() Cursed Hammer •
Cursed Hammer • ![]() Digger •
Digger • ![]() Enchanted Sword •
Enchanted Sword • ![]() Gastropod •
Gastropod • ![]() Giant Bat •
Giant Bat • ![]() Green Jellyfish •
Green Jellyfish • ![]() Illuminant Bat •
Illuminant Bat • ![]() Illuminant Slime •
Illuminant Slime • ![]() Mimic •
Mimic • ![]() Mummy •
Mummy • ![]() Pigron •
Pigron • ![]() Pixie •
Pixie • ![]() Possessed Armor •
Possessed Armor • ![]() Skeleton Archer •
Skeleton Archer • ![]() Slimer •
Slimer • ![]() Toxic Sludge •
Toxic Sludge • ![]() Unicorn •
Unicorn • ![]() Wandering Eye •
Wandering Eye • ![]() Werewolf •
Werewolf • ![]() World Feeder •
World Feeder • ![]() Wraith •
Wraith • ![]() Wyvern •
Wyvern • ![]() Derpling•
Derpling• ![]() Arapaima •
Arapaima • ![]() Spectral Gastropod
Spectral Gastropod
See Forest, Underground, Desert, Underground Desert, Tundra, Underground Tundra, The Hallow, Underground Hallow, Corruption, Underground Corruption, Crimson, Underground Crimson, Jungle, Underground Jungle, Dungeon, and The Underworld for the complete lists of enemies that spawn in those biomes during Hardmode.
Most of these enemies are significantly harder, doing more damage and having higher health and defense than pre-Hardmode enemies. Most pre-Hardmode weapons can prove ineffective, and until a player can obtain new Hardmode gear, they may be forced to avoid enemy swarms and/or play more strategically. Slow-hitting powerful weapons are generally preferable over fast weapons with low base damage because many hardmode enemies have high defense.
In Expert Mode, most pre-hardmode enemies receive significant stat buffs (for example a blue slime will have 287 HP). Expert mode also renders most hardmode enemies much more dangerous to the point where 5-6 hits can kill a player. One must be extremely careful as one mistake is all it takes to be killed.
However not all biomes are immediately buffed with more powerful mobs. The Underworld does not receive any stronger mobs until after a mechanical boss is defeated and the Dungeon doesn't receive any mobs either until after Plantera is defeated.
NPCs
Several new NPCs become available in Hardmode
- The Wizard can be found in nearly any open area underground, initially bound, and speaking to him frees him (similar to the Mechanic and the Goblin Tinkerer). He will then respawn as long as a vacant House is available. The Wizard sells magic-related items.
- Santa Claus appears between December 15th and 31st (based on your computer's time setting), after the defeat of the Frost Legion, so long as a vacant House is available. In mobile, he stays until he is killed or you destroy his home. He sells the Santa costume, Red/Green/Blue lights, the Christmas Tree, and decorations for it.
- The Steampunker appears after defeating one Mechanical Boss, and if a vacant House is available. She sells Teleporters and other steampunk items.
- The Truffle appears once you make a house in a mushroom biome above ground when your world is in hardmode. He sells useful mushroom themed items and the Autohammer.
- The Cyborg appears once you have defeated Plantera, so long as a vacant house is available. He sells rockets and other mechanical items. At night he sells more advanced items such as upgraded rockets.
- The Pirate appears once you have defeated a Pirate Invasion, and sells a vanity set as well as other pirate themed items.
- Template:Pc iconThe Tax Collector becomes available by throwing Purification Powder on a Tortured Soul in The Underworld.
Events
There are several new events in Hardmode:
- The Frost Legion is triggered by the Snow Globe and never invades on its own. The Snow Globe can be used to summon the Frost Legion in non-Hardmode worlds, but the Snow Globe itself can only be acquired from Presents in a Hardmode world.
- Pirate Invasions are triggered by the Pirate Map, or can appear randomly at the start of the day.
- Solar Eclipses behave like the Blood Moon, only during the day, and can appear after any Hardmode boss is defeated. During a Solar Eclipse, unique and powerful monsters will spawn in vast numbers, including Reapers, Vampires, Swamp Things, Frankensteins and Eyezors.
- The Pumpkin Moon is the one of the most challenging Hardmode events. It can only be started at night by the player using a Pumpkin Moon Medallion, which is crafted with 30 Pumpkins, 5 Ectoplasm, and 10 Hallowed Bars. This turns the moon into a scary pumpkin face. The event has 15 waves, with each wave requiring a progressively higher score to progress to the next. Enemies that spawn are Scarecrows, Splinterlings, Hellhounds, Poltergeists, Headless Horseman, a mini-boss Mourning Wood, and a boss Pumpking. More and harder enemies will spawn at higher waves, and there can be several Mourning Woods and Pumpkings attacking at once. The event ends at the end of the night or when all 15 waves have been completed.
- Template:Pc icon Template:Console icon The Frost Moon is an invasion-like event similar to the Pumpkin Moon, though being a step up on the difficulty. It is started by using the Naughty Present at night. Featuring some of the hardest enemies in the game and 20 total waves, it is one of the hardest events in the game.
- Template:Pc icon Martian Madness is an invasion-like event similar to those before it, and is considered to be the most difficult Invasion-style event in Terraria. It is triggered when a Martian Probe is activated and escapes. It features incredibly difficult enemies and will be a challenge to all but the most prepared players.
In Hardmode worlds, Goblin Armies do still invade, and Meteorites still land, each at their regular rates. Blood Moons and Rain also occur just as frequently, though with new Hardmode enemies.
Items
Several new Tools, Weapons, Accessories, Armors, and crafting materials become available in Hardmode, as enemy drops, sold from NPCs, or via crafting. Drills, Chainsaws, and Repeaters are variations of Pickaxes, Axes, and Bows, respectively, which can be obtained once in Hardmode.
Equipment
Each of the many hardmode Ores have their own complete item set, including Armor, Drill, Chainsaw, Sword, Spear, and Repeater. In addition, Hallowed Armor and associated tools and weapons become available: the Drax, Excalibur, Gungnir, and Hallowed Repeater. Crafting Hallow-tier items required creating the item sets for what was then all the hardmode ores and defeating the Mechanical Bosses introduced with hardmode for set-specific boss souls. As of 1.2, their crafting recipes were simplified to need only Hallowed Bars, which dropped when the mechanical bosses were killed.
Many of the hardmode Armor sets have three different options for the Helmet slot, which each benefit players that use either Magic Weapons, Melee Weapons, or Ranged Weapons. Shroomite Armor is an exception - its helmet choices benefit ranged weapons in all cases, although only specific ones (see the article for details).
Magic weapons
New Magic Weapons that are obtainable or craftable after merely traversing the new Underground biomes for a reasonable amount of time include:
Other weapons
Before beating Bosses:
 Dao of Pow deals some very high damage at reasonable range.
After defeating The Destroyer:
- Light Discs help you traverse the new biomes.
- Megashark helps you beat the remaining Hardmode bosses.
After defeating The Twins
- Magical Harp is an upgrade to the Water Bolt.
- Rainbow Rod is the highest tier mouse controlled projectile.
- Optic Staff
can be used to summon a tiny Minion version of the twins.
After defeating Skeletron Prime:
- Flamethrower lets you use all that Gel you've got saved up as powerful ammunition.
Accessories
•![]() Cross Necklace •
Cross Necklace • ![]() Moon Charm •
Moon Charm • ![]() Music Box
Music Box • ![]() Neptune's Shell •
Neptune's Shell • ![]() Philosopher's Stone •
Philosopher's Stone • ![]() Star Cloak •
Star Cloak • ![]() Titan Glove
Titan Glove
Crafting materials
Six different types of Souls are a common requirement for crafting many Hardmode items, and are dropped from various sources.
In addition, the following common materials are used for consumables:
- Pixie Dust (from Pixies) is used in Greater Healing Potions and Holy Arrows
- Unicorn Horn (from Unicorns) is used in Super Mana Potions and Holy Arrows
- Cursed Flame (from Clingers and World Feeders) is used in Cursed Bullets/Arrows
- Ichor (from Ichor Stickers) is used in Ichor Bullets/Arrows
- Crystal Shard (grows in the Underground Hallow) is used in Greater Healing Potions, Super Mana Potions, and Crystal Bullets
Note: See The Hallow, Underground Hallow, Corruption, Underground Corruption, Crimson, and Underground Crimson for complete item drop lists.
Notes
- Hardmode should not be confused with hardcore mode, which is for the character, not the world.
- Clowns have a chance to appear during Blood Moons.
- Demonite Ore and Crimtane Ore do not spread the Corruption and Crimson during hardmode.
Tips
Corruption and Hallow spread
- Corruption or Crimson which gets too close to NPC housing will render them invalid. It should be a priority to craft Holy Water or place Hallowed blocks to aid in its conversion near the edges of any farms or biomes of this type and contain them as soon as possible.
- Once you get the Steampunker, you might want to buy the Clentaminator for 2 platinum, along with its ammunition, named Solution. It is a quick and handy way of cleaning/destroying/creating biomes.
- Corruption/Crimson can completely devour the Jungle. To farm Plantera, Chlorophyte Ore, or other jungle enemies, consider sealing off the underground jungle with Hallow, as this will prevent the conversion of jungle grass and mud blocks.
Difficulty
- When beginning Hardmode, a player can easily become overwhelmed by the difficult new enemies, which have Health and Damage many times greater than regular-mode enemies. It is advisable to start by identifying your most damaging weapons and investing money in Reforging them to acquire high damage bonuses, as well as reforging your Accessories to add high defense bonuses. Low-tier Hardmode weapons begin at around 35 damage, so viable regular-mode weapons of use will be the Sunfury and Night's Edge as melee options, the Molten Fury and Flamarang as semi-ranged, and the Flower of Fire and Demon Scythe as magical. Reforging these and making use of other damage boosts from Accessories or Armor bonuses can easily push these weapons into damage ranges that will make Hardmode fights relatively balanced.
- Because hardmode relies more upon drops than treasure chests (which don't suddenly respawn with more loot), players will need to kill large numbers of these tougher enemies for items like Souls or Pixie Dust. Consider building mini-bases with proper protections that involve shallow lava pits above small access tunnels that run between Underground Hallow and Corruption/Crimson biomes. Use Active Stone Blocks to make the "doors" that let you jump up and grab floating souls. Place walls to prevent spawns inside your mini-base. You will still need to fight off the occasional Cursed Hammer, but it's a much easier job to farm these enemies when you reduce the threats to a few at a time. Eventually, they will drop either a good weapon, or the resources needed to craft one.
- Mechanical bosses and invasions can take the player off guard. It's best to leave and rejoin if you are ill prepared.
Resources
- Don't throw away your Iron Ore/Bars, Lead Ore/Bars, Bones, Lenses, Vertebrae, and Rotten Chunks, as these are used for crafting Boss-summoning items in Hardmode. If you need to collect more, it may be easier to create a new non-Hardmode world and collect them there, along with any other pre-Hardmode materials you find yourself needing.
- The Eater of Worlds and Eye of Cthulhu are commonly used by players as a good source of money, and this is still useful during the beginning stages of Hardmode. However, summoning them in Hardmode can be more difficult: eg. you've probably destroyed any close Demon Altars (needed to craft the Worm Food and Suspicious Looking Eye), you may have demolished your nearby Corruption farm or Arena, and trips to the naturally-occurring Corruption are now more hazardous (Eater of Worlds must be summoned and fought within Corruption). It is much easier to simply create a new non-Hardmode world to farm these bosses, then use the funds collected from them in your Hardmode world. The Wall of Flesh can be farmed and drops about 8, and items which each sell for approximately 3.
- One way to farm money in Hardmode once you become reasonably able to traverse the Underground Hallow (aside from using a glitch) is to collect Crystal Shards, which are common and sell for 1 59 84 for a full stack of 999 (each one sells for 16). Since they grow naturally on any pearlstone surface facing air, you can mine away stripes of pearlstone in areas you visit often to farm crystals more readily.
- Farming the Destroyer once you can beat it is another way to make a considerable amount of money, since you can farm it without too much additional effort. Because it is relatively easy to kill quickly and can easily be meleed to death (avoiding spending any money on ammunition), the Hallowed Bars it drops can be crafted into Light Discs, together with the Souls of Might it also drops, and with Souls of Light which can be obtained in the Underground Hallow. Each Light Disc sells for 10. As it drops 15-30 Hallowed Bars and 20-40 Souls of Might per kill, that is typically 3-7 Light Discs per run (if you have enough Souls of Light, that is). The Souls of Might it drops may also be sold for additional money, 80 each, which is another 16-32 per run if you don't spend the souls on Light Discs, in addition to the 12 the boss drops. In total, you net 42-82 , and due to the ease of crafting the Mechanical Worm and the relative quickness with which you can dispatch the boss, you can fight it multiple times in a single in-game night.
- Wait to open Crates until Hardmode so as to be able to immediately get some hardmode ores and bars without even smashing any altars or mining. The Enchanted Sundial can also be salvaged from crates; it is an immensely useful item as it allows you to skip a day every week. Even Souls and Ichor/Cursed Flames/Crystal Shards can be looted from crates without even visiting the Hallow/Crimson/Corruption.
History
- 1.2.1: Added messages to help the player progress in hardmode.
- 1.2:
- Jungle, Dungeon, Crimson and Snow biomes are all affected by hardmode now.
- Cobalt/Palladium Drill can not mine Adamantite and Titanium.
- There are 2 new hardmode events.
- A massive amount of Hardmode items/monsters added.
- Early hardmode enemies now do less damage and have less health/defense.
- Hardmode bosses have a chance to spawn on their own to help players progress through the game.
- Current hardmode bosses now do slightly less damage and have had their health decreased.
- 1.1: Introduced.
Template:Translation project