Template:Pc only The Celestial Towers (aka Pillars) are four Bosses that appear during the Lunar Events, at 4 predetermined spots on the map (2 west and 2 east), when the Lunatic Cultist is defeated. There is the Vortex Pillar, the Stardust Pillar, the Nebula Pillar and the Solar Pillar. The craftable gear from each pillar correspond to the 4 main classes in the game; Vortex for ranged, Stardust for summoner, Nebula for magic, and Solar for melee.
At the beginning of the battle, The Pillars have a large force field around them, which protects them from any damage. In order to lower the field, you need to defeat 100 minions (150 in Expert Mode), after doing that the Pillar can be damaged. Minions will continue to spawn until the Pillar is defeated. If you exit the game without destroying a Pillar, all damage done to it will be reset.
The bosses themselves are fairly easy, having only 20000 HP each and dealing no melee damage on contact. While they may not be a direct threat, the minions they spawn deal high amounts of damage and can easily swarm the player if not dealt with swiftly. Also, most of these towers have a few ranged attacks that you have to watch out for.
Defeating each triggers the following status messages:
- First Tower destroyed: "Your mind goes numb..."
- Second Tower destroyed: "You are overwhelmed with pain..."
- Third Tower destroyed: "Otherworldly voices linger around you..."
- Fourth Tower destroyed: "Impending doom approaches..."
After defeating all four Celestial Towers, the Moon Lord will spawn after about a minute.
Quick Answers

What triggers the appearance of the Celestial Pillars in Terraria?

What is the significance of the 'your mind goes numb' message in relation to the Celestial Pillars?
What are the differences between the Stardust Pillar and the Vortex Pillar?
What happens when a Celestial Pillar takes control of a map area?
Vortex Pillar

| Type | |
|---|---|
| Environment | |
| AI Type | 94 |
| Damage | 0 |
| Max Life | 20000 |
| Defense | 20 |
- Item (Quantity)Rate
 Vortex Fragment
(12-60 (18-90 Expert))100%
- Internal NPC ID: 422
The Vortex Pillar is the ranger-themed Tower, with most of its enemies being able to fire projectiles and move quickly. It is found in the green moon area. After defeating the tower, it drops around 30-40 Vortex Fragments on average.
It will occasionally summon a similar projectile as the Lunatic Cultist where he summons an immobile, Giant Magnet sphere that shoots lighting at the player.
Gravity around it does not work the same as in other places, instead pushing the player up in the air to some height in a similar way as water does with slimes. This is caused by the Distorted debuff when the player is hit by a Vortex creature.
Summons :
| Template:Il2c |
| Template:Il2c |
| Template:Il2c |
| Template:Il2c |
| Template:Il2c |
Stardust Pillar

| Type | |
|---|---|
| Environment | |
| AI Type | 94 |
| Damage | 0 |
| Max Life | 20000 |
| Defense | 20 |
- Item (Quantity)Rate
- Stardust Fragment
(12-60 (18-90 Expert))100%
- Internal NPC ID: 493
The Stardust Pillar is the summoner-themed tower, with most of its enemies spawning smaller entities to attack. It is found in the cyan moon area. The Stardust Pillar is also able to spawn enemies itself via a special animation. The Stardust Pillar will spawn multiple spheres of energy, they will link together with a thin line and the line will quickly disappear, shortly after, the energy spheres will disappear and spawn in an enemy. After defeating the tower, it drops around 30-40 Stardust Fragments on average.
Summons :
| Template:Il2c |
| Template:Il2c |
| Template:Il2c |
| Template:Il2c |
| Template:Il2c |
| Template:Il2c |
Nebula Pillar
| Type | |
|---|---|
| Environment | |
| AI Type | 94 |
| Damage | 0 |
| Max Life | 20000 |
| Defense | 20 |
- Item (Quantity)Rate
- Nebula Fragment
(12-60 (18-90 Expert))100%
- Internal NPC ID: 507
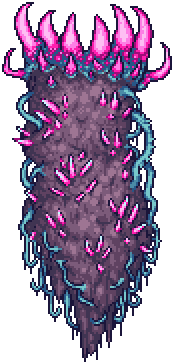
The Nebula Pillar is the magic-themed Tower, with minions that are able to fly, teleport, and fire complex patterns of projectiles. It can be found in the violet moon spot during the Lunar Events. It drops around 30-40 Nebula Fragments on average.
It's the only pillar that doesn't have any kind of attack, although you should still watch out for its minions. While near this boss, the player's screen will take on a dull purple shade, tinting all blocks, players, monsters, and the sky purple.
Summons :
| Template:Il2c |
| Template:Il2c |
| Template:Il2c |
| Template:Il2c |
Solar Pillar
| Type | |
|---|---|
| Environment | |
| AI Type | 94 |
| Damage | 0 (90 Solar Fragment) |
| Max Life | 20000 |
| Defense | 20 |
- Item (Quantity)Rate
- Solar Fragment
(12-60 (18-90 Expert))100%
- Internal NPC ID: 517
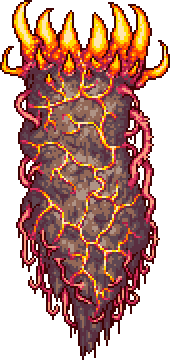
The Solar Pillar is one of the four Celestial Towers, which is often considered the strongest. Many of the enemies that spawn near it are melee-themed, with strong defensive abilities, heavy contact damage, and few projectile attacks. It is found in the orange/red moon area. After defeating the pillar, it drops around 30-40 Solar Fragments on average.
The Crawltipedes that the Solar Pillar spawns can be devastating to players using flight, as they deal high damage and are very agile, however, they do not have much health. They can only be damaged on their tail, where they have an orb that gets redder when they take more damage.
Summons :
| Template:Il2c |
| Template:Il2c |
| Template:Il2c |
| Template:Il2c |
| Template:Il2c |
| Template:Il2c |
| Template:Il2c |
Tips
All Pillars
- A quick and effective way to kill all of the pillars is to use the North Pole directly and vertically above a pillar. Even if a player does not have any melee modifiers, if all of the snowflakes can make contact, the pillar should fall in less than 20 seconds.
- Another strategy is to use the Nimbus Rod as you can summon two above the pillar and let it deal constant damage. If you leave a nimbus cloud above the tower and teleport away, it will still do damage until either the tower dies or the cloud runs out. This tactic can be combined with Spectre Armor and a Spectre Hood for long distance healing, as the healing effect has a very long range.
- You can also use Minions(or a Spore Sac) while taking cover in a hole to do a safe kill. Take a note that some enemies can travel through blocks.
- Some other weapons might be more effective, but they are not obtainable until the first pillar is destroyed. Therefore, if you decide to start with the Vortex Pillar, using the Phantasm will be incredibly effective for the other pillars. The Solar Eruption (from the Solar Pillar) also deals massive piercing damage and is very effective as well.
- Some Pillars and their enemies seem to be weak to their own weapons. For example, the Nebula Pillar is weak to the Nebula Blaze and Nebula Arcanum.
- The longer the time taken to defeat a pillar, it will sink deeper into the ground, but very slowly.
- Repetitively throwing Vampire Knives will keep you healed most of the time, and if you get to less than 150 hp, use a Greater Healing Potion or higher. This will slowly take out the enemies and the pillar itself. Switching to another weapon is a bad idea, unless you have full Spectre Armor with a hood, though following this strategy, you should have Beetle Armor.
- Using the maxed Attack Nebula buff with the Lunar Flare, around 3000 DPS can be dealt on a pillar, effectively killing one in seconds.
- The shield surrounding the pillars becomes more transparent as it becomes closer to breaking. This is a good indicator of when the shield will break and leave you able to damage the pillar.
- The hardest pillar to deal with is the Nebula pillar as it is the only pillar whose enemies can deal massive damage, even if the player is underground or in a bunker. The easiest way for players to deal with the pillars is to use a weapon which can hit through blocks, such as the Death Sickle, and mine tunnels starting from just outside the event zone until you can reach the pillar with your chosen weapon. All that's left to do is to grind though any enemies which converge above your location. I strongly recommend taking down the Solar Pillar first as it allows you to craft the Solar Eruption which will speed up the process.
Vortex Pillar
- If you see a swirling portal form in midair, keep your distance and move quickly. The portal will either shoot a lightning bolt similar to the Lunatic Cultist's attack or spawn an Alien Hornet. When the portal shoots a lightning bolt, there will be a blue swirling marker pointing towards the direction the lightning bolt will strike at. Lighting bolts will only shoot downwards. The Vortex Pillar will always spawn Alien Hornets on back-walls with a direct line towards the player if there are any on the player's screen. of not, it can spawn Alien Hornets anywhere within an approximate 300 block radius of the tower.
- It can be easiest one of all pillars to deal with, as it lacks enemies that could move or shoot through walls, thus making AFK trap-based battle with player enclosed in solid blocks possible. (As of 1.3.0.4 it is impossible, due to Vortex Pillar spamming portals which create hornets/shoot lightning.)
Stardust Pillar
- Using splash-damage weapons on Star Cells is perhaps the easiest way to kill them, as it will destroy all of the split cells as well as the initial cell.
- A quick and easy way to break the shields (especially on expert worlds) is to lead a star cell away from the tower, pop it into its smaller orbs, then let those orbs grow into full star cells. This creates an infinite loop, and the new star cells will also count towards the breaking of the shields.
- Arguably, the Stardust Pillar is the easiest of the lot; its enemies are predictable and slow in their motions, and with focus, even the most menacing of the lot, the Flow Invader, can be easily countered.
- On death, the Flow Invader will hurl up to three projectiles directly at you (potentially fewer if it is freshly spawned and hasn't yet accumulated its full contingent of orbiters). Be ready to dodge when you kill this creature.
- Milkyway Weavers can be easily slain by using splash-damage weapons on them as soon as they burrow out of the ground. This will ensure that even if your projectile doesn't strike their head directly, it will still deal splash damage as it hits the ground next to it.
Nebula Pillar
- When fighting, take caution to avoid getting hit by a Brain Suckler. They cause the Obstructed debuff, which is similar to Blindness but with a darker shader. It will persist until you kill the Brain Suckler stuck to you, and for a moment thereafter.
- Be very wary of Nebula Floaters. They do high damage with high accuracy, and their tendency to teleport - especially when harmed - can make them unpredictable. Nothing prevents a Floater from teleporting directly in front of you and firing at point blank; if you wouldn't survive another shot and can't heal up, it may be best to retreat and recover.
- Kill Evolution Beasts quickly, because once they get in range they will fire a slow but highly damaging ball of energy that tracks the player, passes through walls can deal continuous damage, and only expires after a few seconds. These will force the player to move around into other hazards and enemies.
Solar Pillar
- While fighting the Solar Pillar enemies, it is highly recommended to stay grounded. Airborne players are easy prey for the Crawltipede minions, who do an excessive amount of damage but only attack airborne players.
- If you have a skybridge set up in your world, standing on it will allow you to shoot down at enemies on the ground and even the pillar without being targeted by the Crawltipedes. Keep in mind Srollers will still be able to jump up to the platform and roll towards you.
- If you have already problems killing the enemies to get the shield down, an easy solution is to dig a tunnel under the Pillar and use weapons that go through walls like the Death Sickle or the Nettle Burst. It will help a lot using the Spore Sac (Plantera Expert Item) and a random minion. You can also kill the Pillar using a wall-piercing weapon. If it is stuck on a hill, you can build a non-platform bridge to it without being assaulted by Crawltipedes. It may be wise to prioritize Corites, as they can and will attack you without regard to intervening terrain.
- If you are low on health, and you are wearing wings, a good strategy for regaining health is to alert a crawltipede and hit it with Vampire Knives. Due to the fact that they take ten times as much damage as any other enemy and have a high amount of health, it is a good way to build up health fast; provided you can dodge the Crawltipede itself. However, if you are struck by the Crawltipede with low health, you will most likely be slain.
- It is highly suggested not to use bullets, arrows or Meowmere, at least not on Selenians as they can reflect bullets that deal the same damage they would have dealt to the enemy. Powerful weapons of those varieties can easily be turned against you and you can die very quickly. Selenians, however, cannot reflect Rockets, so it is suggested to use those against them if you are to play ranged.
- If you have a Neptune's Shell or above, or Gills potions, standing in a large pool of water under or near the pillar will allow you to move around off the ground, without being targeted by Crawltipedes. In addition, this will also cause most enemies, with the exception of Corites, to move slower, and make it easier to target them. Srollers seem to stand still in the water, making it incredibly easy to target them. This strategy also works well with Vampire Knives, allowing you to heal more efficiently. Can be done easily with pre-Plantera armors, such as Chlorophyte.
Pillar Spawning Mechanics
When it is time that 4 pillars should spawn, the game follows these steps: (The coordinates are for tiles, not for pixels.)
1. Randomly arrange the order of the 4 pillars.
2. Equally divide the world horizontally into 5 sections, which create 4 "gaps" in the map and the x coordinate of the "gaps" decides the rough spawning spot of every pillar. (For example, the large world is 8800 tiles in width, which means that the 4 pillars will be spawn at somewhere near x=1760, x=3520, x=5280 and x=7040) 3. For each pillar:
a. Pick a random x coordinate in [x_0 - 100, x_0 + 100] in which x_0 represents the x coordinate of the gap that the pillar correspond to. Use x_1 to represent it.
b. The game try to find out a possible y_1 to spawn the pillar at (x_1, y_1). The y_1 is processed from the 0' surface point to somewhere 100 tiles below the top of the world, from low to high. The game checks whether this place can be a valid spawning space for a pillar based on:
i. No solid blocks(don't include platforms and other similar tiles) in the rectangle of x coordinate [x_1 - 10, x_1 + 10], y coordinate [y_1 - 20, y_1 + 15](the smaller the y is, the higher height the spot lies)
ii. The pillar will be outside the player's sight. (Actually the game checks whether tiles (x_1 - 10, y_1), (x_1 + 10, y_1), (x_1 - 10, y_1 - 20), (x_1 + 10, y_1 - 20) are all outside a rectangle centered at the player with a width of 1920*1.2 pixels and a height of 1080*1.2 pixels.)
c. If one y_1 works then the pillar spawns at (x_1, y_1).
d. If none of the valid y_1 works, go to step a.
e. If the steps a.~d. has been run 15 times before it succeeds, it will give up and just spawn at a settled point: (x_0, y_0 - 40) which means that it will always spawn at -80' Underground and a fixed x coordinate.
Trivia
- The Nebula Pillar is the only pillar to not have an attack that damages directly, as the Solar Pillar attacks with solar fragments, the Vortex Pillar summons portals that either shoot lightning or spawn Alien Hornets, and the Stardust Pillar attacks by summoning white portals that either spawn Star Cell, Milkyway Weaver or Flow Invaders.
- Each pillar applies a shader to the screen, which makes it easy to distinguish when the player has entered a Lunar Event zone.
- The Celestial Towers, Lepus and Turkor the Ungrateful are the only bosses that don't drop trophies.
- All of the towers have a humanoid enemy. Vortex Piller: Vortexian, Stardust Pillar: Stargazer, Solar Pillar: Selenian and Drakanian and Nebula Pillar: Predictor.
History
- 1.3.0.4: Vortex Pillar summons portals faster.
- 1.3.0.2: Buffed health from 15000 to 20000.
- 1.3.0.1: Introduced.
Template:Translation project